Hello eighteen25ers! I'm so happy to be visiting and sharing cookie love with you again!
Tis the season, right? Cookie swaps and neighbor gifts are in full swing. I love it!
Today I'm sharing a little cookie kit for you to giveaway, or better yet make one for your own family!
This is like a cheater way of making gingerbread houses. You don't have to hold the walls, break the roof, and frost while vertical. And this is a house that's made to eat, not look at! My kids don't like gingerbread (I don't know where I went wrong) so they much prefer eating a big sugar cookie at the end of a fun decorating session.

So our little kit consists of 3 things. Some cookies that are frosted with a base layer of brown royal icing (to imitate the look of gingerbread), some candy, and some white royal icing to adhere the candy.

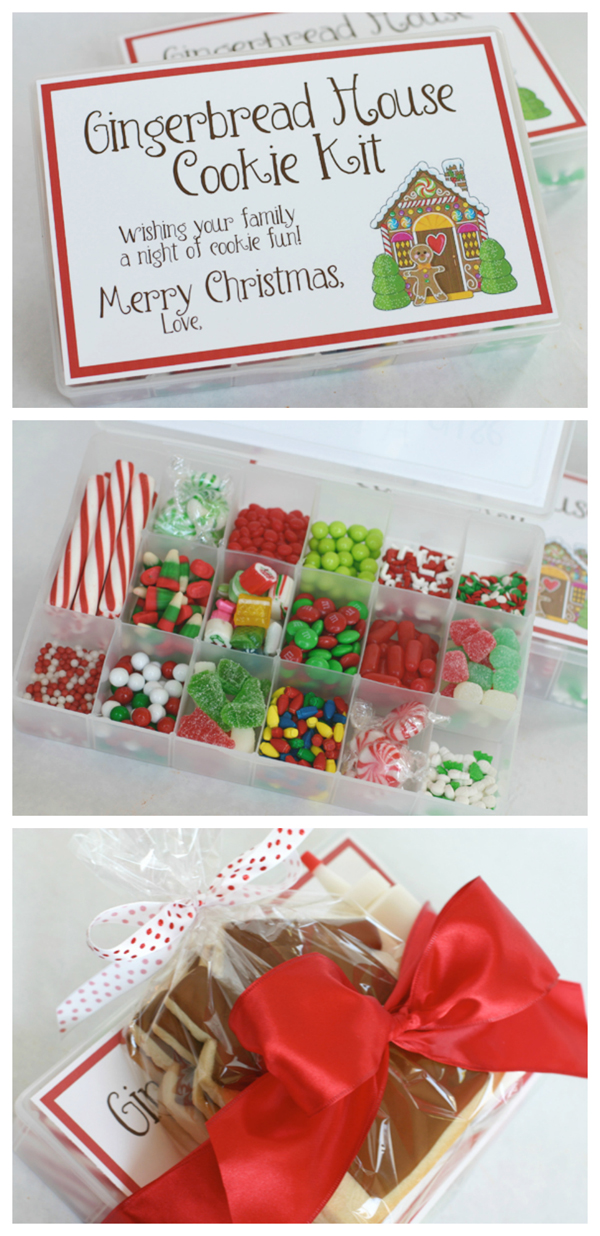
I'm soooo excited to share this little candy box here, because it was inspired by one of my all time favorite eighteen25 posts. Remember the teacher gift organized in the craft box? Well that inspired me to do this project in a craft box, and now my little candy kit is going in one too!
I gathered some candy and sprinkles and portioned it out. It brought back memories of organizing my Halloween candy in a fishing tackle box as a kid (for real!). And my re-organizing my caboodle on a weekly basis as a teen. Man, I just have a passion for divided plastic containers. Okay, getting side-tracked, but seriously, what kid wouldn't LOVE this spread? My kids sure bounced off the walls when I showed them! It's way better than the one kind of sugar pearls that come in store bought cookie kits.

I made a little cover for it, eighteen25 style.
(you can download it HERE)

Now that your candy kits are ready, you just need some sugar cookies. Use your favorite recipe, or refer to my recipe here. And were you worried that you don't have a house shaped cookie cutter? No worries! A knife is my favorite and most used cookie cutter! You can cut a template out of paper and simply set it on top of the dough as a guide. You can decide how big or small your cookies will be!

Now you need to prepare your royal icing. Refer to this post for the recipe and tips on consistency. Before you tint most of your frosting brown, fill the bottle(s) of white that you will give with your gift. A medium to thick consistency will do for the white. You will need a thicker consistency, and a thinner (flooding) consistency of the same brown.

I decided to do my base layer in steps, letting in dry a few minutes between each fill.
This just created a little bit of dimension and character to my plain brown base layer.

You don't need to be crazy like me. You can certainly just do one big outline and fill.

But a really important thing is bubble popping while the icing is still wet.
It will dry much smoother if you do this. Just use a toothpick and pop! If it leaves a mark, it is too dry.

The lucky recipient of your gift can use the white icing and candy to create simple little gingerbread house cookies. But my kids didn't last very long before they stopped decorating and started eating!

In the end, I decided to give one decorated cookie on top and several plain brown cookies underneath.

This is not crazy hard decorating, this is meant for low key, kid enjoyment. Their candy box will go a long way and probably last for another cookie decorating session. I have to say, my kids decorate cookies ALL the time and they still get excited about it. I love the time we share sitting at the table together. Cookie decorating HAS to be one of the best holiday traditions!
I'm wishing you all a happy cookie (holiday) season!
And thank-you Jamie, Jodie and Jen for having me again! You guys are the best!
I'm always on pins and needles to see what you girls will post next!
. . . . . . .
Pin this...


No comments:
Post a Comment