i'm sure you all remember the super cute jack-o-lantern cookies that Bee In Our Bonnet first shared here. well we are so excited to have ashleigh back and i'm sure you'll love these fantastic cookies just as much.
. . . . .
Hey there! We are so happy to be visiting here at eighteen25 again! Only, I have a problem...
I've been so obsessed with staying on top of my Christmas game, that frankly I'm more prepared for that than Thanksgiving. Which is next week! My menu isn't even solidified! The shame is horrible.
I do love to cook. But I might love planning out the table decor just as much. And a fabulous place card/holder can really make your table look really special. You know I can't get enough of sugar cookies, so this year, the cookies are going to take center stage as the place cards themselves.
They are the star of the table!

Everyone that arrives is going to feel pretty flattered that you made the extra effort!

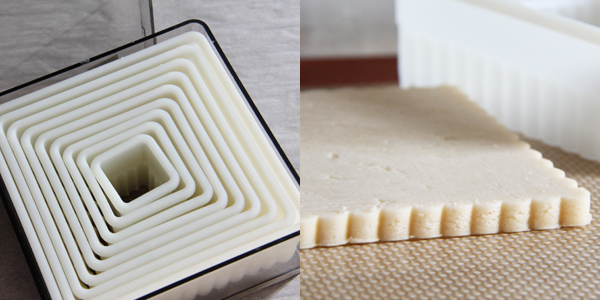
I stated with my tried and true recipes for sugar cookies and royal icing. Then I reached for one of my favorite cookies cutter sets, my scalloped squares. If you are going to invest in sets. I love this one and the scalloped circle one too.
This post will tell you all about different consistencies of royal icing. I use americolor gel paste colors to tint and then prepare them in different squeezies. I use a toothpick on top to keep them from drying out.

There is a lot to talk about with consistencies and techniques. But for this cookie, decide your base color and make 2 thicknesses. You will need a thick (20/25 second) royal icing and a thin (6/7 second) royal icing to fill it.

Make an outline with the thicker icing. Then fill from the outside in with the thinner one. If you fill right away you can make that outline disappear. If you let the outline dry, it will show a little. Then you need to pop those pesky air bubbles with a toothpick until you have a smooth surface. You only have about a minute to do this before it starts to dry and leave marks. Try to shake the cookie horizontally if that happens, you may still have a chance of them flattening out. Let your base layer dry for 12-24 hours.

For the turkey feathers, I used what's called a "brush embroidery" technique. I talked about it in these vintage cookies. You will use fairly stiff (20 secondish) royal icing for this part. You can use a #2 or #3 tip. You will need a new paint brush that you can dedicate to your frostings, not paintings. Start with a scalloped line, then while it's wet, brush inward. Wipe your brush on a damp paper towel every few strokes so you won't get too much build up.

Don't you love how it gives it texture!? And it's strangely fun and addicting. You've been warned. Let each layer dry for at least an hour before you do another one. This is one of those things you do a little, then run some laundry and errands, then you come back to it...

After your feathers are dry, you are going to make a little pear shaped body with a medium (10 second) brown icing. Start with an outline and fill.

After that dries, make a little triangle beak. I make a small dot and with a toothpick, drag the corners out. Then you have to do the little gobbler with that same red. And the finishing touch on your turkey is eyes and legs. I used an edible ink pen, but you could certainly use royal icing.

For the names, I switched out my #2 tip for a #1 tip. I like fine point pens!

Now these beauties need to be loved and adored because they took 278 steps, right?
So I put them in these simple little display stands (which will pretty much always be cookie stands) that I found at JoAnns. They have many versions of mini table easels at any craft store.

I like it right on top of the plate, but you can scoot it back and still enjoy it when you have the actual turkey on your plate.

My husband would much prefer his to say "head chef" than Dad. He takes pride in his meal. But this little joke got me thinking that if you weren't hosting, you could give them as a hostess gift.

Even if you don't have the stands, they make a really pretty statement at your Thanksgiving table. If you wrap it, they can take it home and save it for later. So you basically just made a party favor too. Aww yeah, place cards and favors. Two for one! I love a good deal!

As much as I hate to go, I must get going on that menu!
You are all welcome to our Thanksgiving table blog anytime.
My sister and I will be here, at bee in our bonnet with more cookies and craziness if you need us.
Thanks Jamie, Jodie and Jen!
. . . . .
. . . . .
now those are just too fun ashleigh!!
it's a place card...
it's a yummy favor...
and it's a super cute decoration...
it's perfect!!
you just continue to WOW us. thanks so much for being our guest today. :)
this post is sponsored by:


No comments:
Post a Comment